Overview
Working Shifts define when work happens on a project; each shift has a name, a weekly schedule (start and stop times per day), assigned workers, and rules that govern how punches inside and outside that schedule are handled.
The release of Working Shift 2.0 in May 2026, adds customizable Time Rules per day, day on/off toggles, out-of-range punch tracking, schedule SMS notifications, per-worker auto-assign controls, bulk worker actions, and one-click shift import from any other shift.
Additionally, the system monitors tardiness, flagging late arrivals based on each worker’s shift start time.
Requirements
Check the feature requirements below
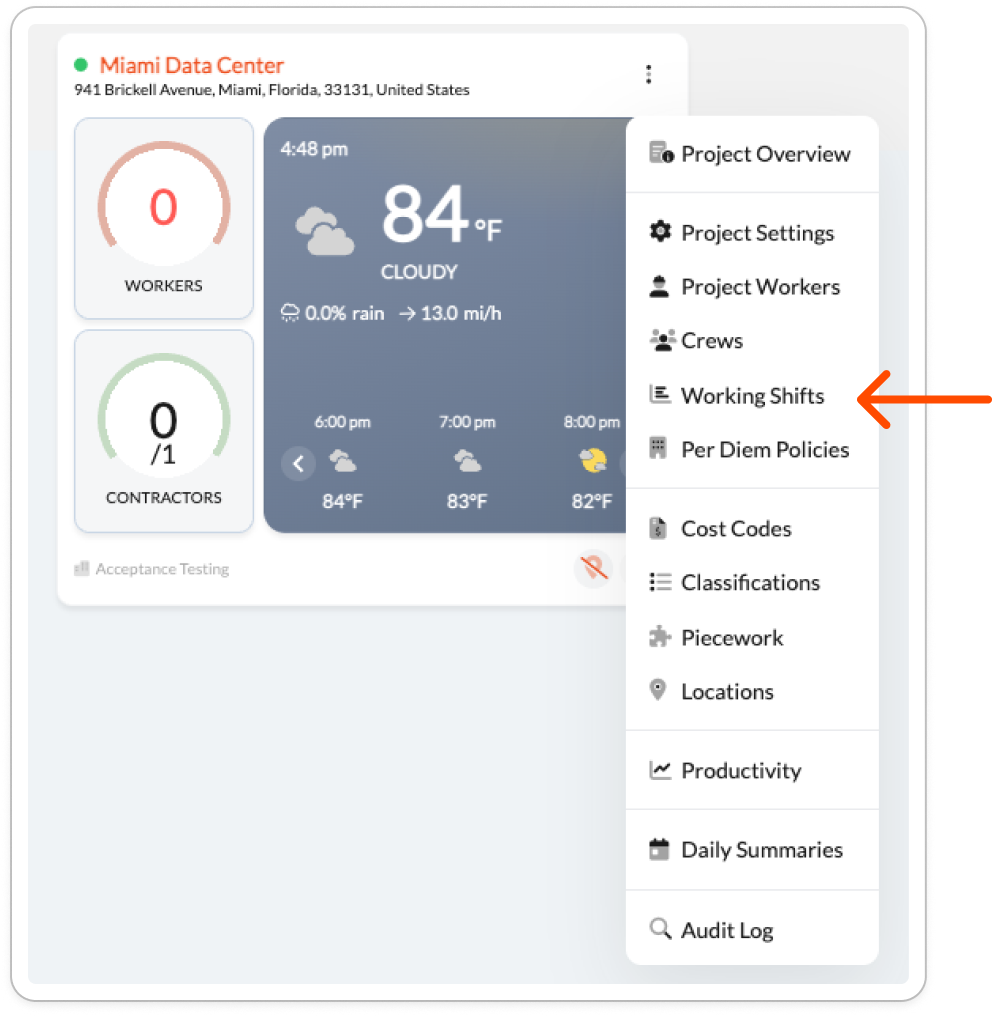
1. Access to the feature from the project settings.On the project, select the three dots in the right corner to display options and look for "Working Shifts".
This module will be visible only to Admin users and users with Manage Working Shift permission enabled.

2. User permissions
Review the user permission list and verify that the option "Manage Working Shift" is selected.

3. Create a list of tardiness reasons for late shifts
Go to the Company settings, select General and add multiple reasons

Part 1. Set up a Working Shift
Step 1. Go to project settings, click on the top-right menu, and select "Working Shifts."
Step 2. Create a shift by clicking "Add Working Shift"
- Enter name the shift (e.g., “Morning Shift,” “Evening Shift" or "Main shift")
- Add code, description
- Click "Create" to commit


Part 2. Set up a Schedule for Working Shifts
Step 1. Select Shift Days and Hours
Specify for each day of the week the start and stop times of that shift's hours. If weekends follow different hours, then the hours should be adjusted accordingly.
Days when the workers are are not required, toggle OFF. On these days, the workers will not be shown on the absentee list.

If you require more refined Time Rules, toggle Configure Time Rules and see How to setup working shift time rules for more instructions.
All edits to the schedule section auto-save.
Step 2. Set tardiness settings
Configure the "Mark Shift Late Based on" setting and decide whether to mark a shift late based on Raw Punch Time, Rounded Time, or Do Not Automark.
-
Raw Punch Time: The system will mark the shift late based on the exact time the employee clocked in.
-
Rounded Time: Late status is determined after applying any time rounding rules.
-
Do Not Auto-Mark: The system will not automatically mark shifts as late.
For example, if you want lateness to be tracked based on when someone actually arrives, select "Raw Punch Time".
💡 Tip: Use the icon next to Monday![]() to clone times for other weekdays
to clone times for other weekdays
Step 3. Set up rounding rules for the working shifts
Scroll down to Round Up Rules section and you have the option to configure custom round up rules for this scheduled shift.

Note: When Time Rules are enabled for any day, the Round Up Rules are then applied per day and this section will be greyed out. See How to setup working shift time rules for more details.
Note: Project Worker Round Up rules take precedence on Working Shift Time Rules or Round up Rules. If Working Shift time rules or rounding rules are not being applies for a specific worker, look at Project Worker > Round Up rules for that specific worker.
Step 4. Review Timesheet in the Project Overview
Once your shift settings are set up, you can go back to the Project Overview. You’ll notice new elements displayed on the dashboard:
- Clock Icon: Indicates whether the worker was on time or late
- Working Shift: Shows which shift the worker belongs too. Click to get drop down of shift available to reassign.
- Working shift auto-assignment: Green dot indicates if auto-assignment occurred for this worker on this shift.

💡Tip: if the clock⏰ icon is marked:
![]() Yellow/orange means the shift is being marked as "late" for the rule
Yellow/orange means the shift is being marked as "late" for the rule
![]() A Grey clock means the shift is being marked on time
A Grey clock means the shift is being marked on time
![]() A blue dot indicates the shift has been modified
A blue dot indicates the shift has been modified
Step 5. Assigning Workers to the Right Shift
- Worker Assignment - In Working Shift list view, toggle on Auto-Assign Working Shift if you want the system to auto assign workers to the nearest shift based on their punch in time.

- However, if you have several shift with similar start time, we recommend to leave this off.
- When Auto-Assign is ON, you can choose have specific workers exempted from the auto-assignment by clicking the button in their row.

-
Manual assignment - Manually add workers to shift with the "Add" modal.

-
Select the checkbox to send workers a SMS notification when they are assigned to a shift.

-
-
Remove workers individually with delete button or many at once with bulk action.
Step 6. Notify Assigned Workers
You have the option to:
- Notify a worker when adding to shift as per above;
-
Reminding individual workers of their shift info via notify button; or

-
Bulk-notify several workers using the Bulk Actions.

- Also have the option to notify worker when updating their working shift in the timesheet.

Part 3. Importing Working Shift Settings
Use the new Import Settings to copy working shift settings from another. This also works across projects.

Part 4. Tardiness
If you click on the clock ![]() icon next to a worker's name, you will have two options:
icon next to a worker's name, you will have two options:
-
Unmark as Late: Change the status from late to not late.
-
Remove Late Flag: Completely remove the late flag from the log.
For example, if a worker was late or couldn’t check in on time due to a valid reason (like being busy with a task), you can click the clock icon and remove the late mark. Then, you’ll be prompted to add a reason for why the change was made.

* The reason field is required to save changes.*
Tardiness or Working Shifts Filters
Tardiness filter and Working Shift are available in both Company Timesheet and Project Timesheet

Videos:
Working Shifts